Category Archives: blog

Houseplant of the Month: Phalaenopsis Orchid
If you are lucky enough to have a Phalaenopsis, you are about to enter the [...]

Indoor Gardening with Kids
When the outdoor garden is tucked away for the winter — the saplings supported, the [...]


Poinsettia Plant Care Tips
Holiday Poinsettia Plant Care Poinsettia care begins with proper light, water, and temperature conditions. During [...]

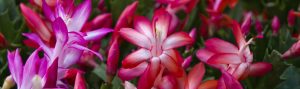
Christmas Cactus
Christmas cacti are a very popular houseplant—and for good reason! When they bloom, they produce colorful, [...]
Preparing Your Roses For Winter
As winter approaches we turn our attention to preparing the garden for slumber. Beds are [...]

Houseplant of the Month: Norfolk Island Pine
Norfolk Island Pine Plant Features An easy-care houseplant, Norfolk Island pine is a festive holiday [...]